
In this blog post we going to integrate Detox reports in Jenkins CI/CD pipeline.
But first let’s see how test reports working in Jenkins. Most likely you going to have JUnit plugin pre-installed in Jenkins, if not head to Plugins configuration and install it (here is the link to plugin). Once JUnit plugin installed you can go to job configuration (lets look at manual setup before we start working with pipelines), click Add Post-build action drop down and select Publish JUnit test result report. Configure the setup for report, in my case I just had to add path to xml file.
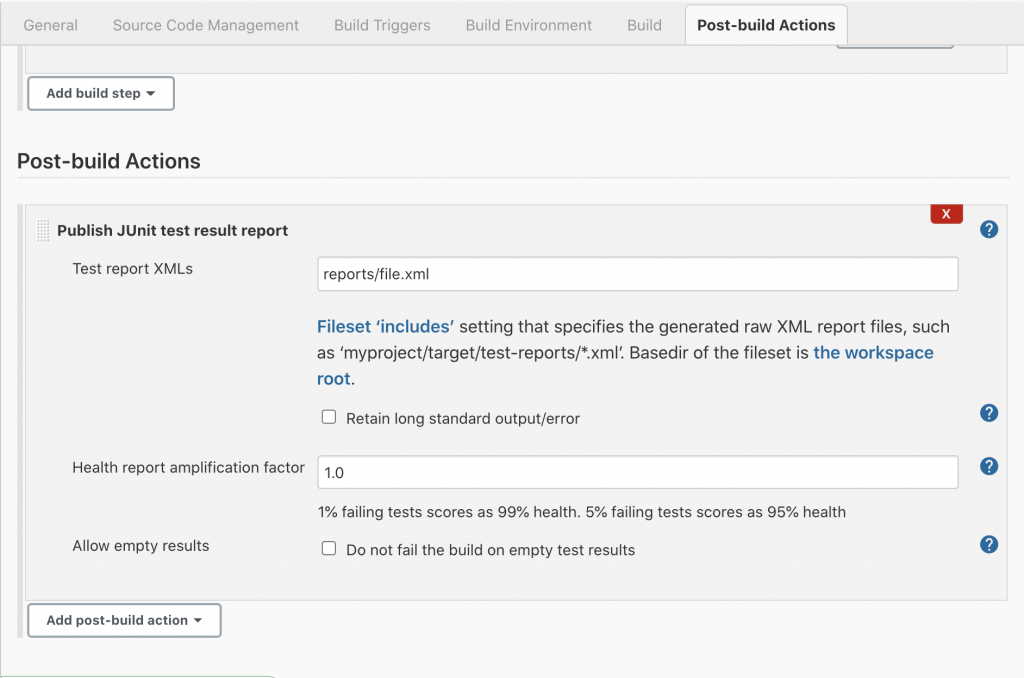
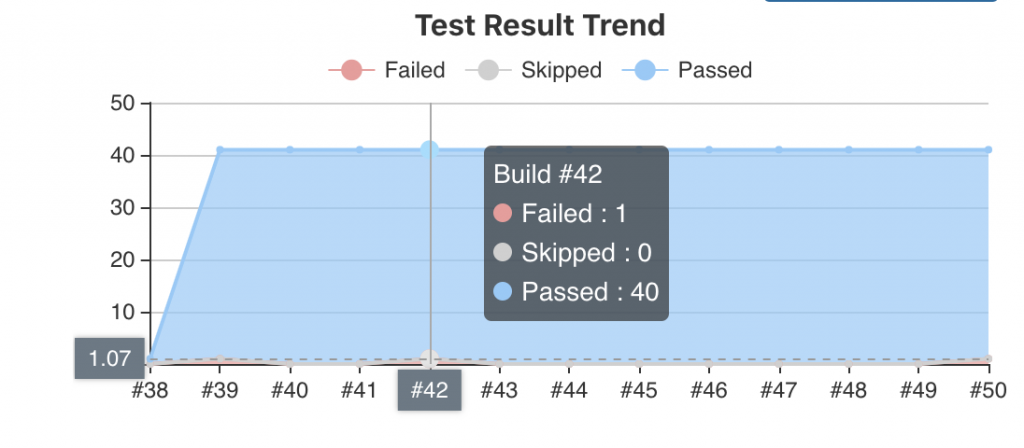
When everything configured and saved you can execute the job, once the tests finish it will generate the xml report, plugin will grab it and parse results. With time you will see test result trends and fix flaky tests in case you have some.
Now let’s get back to our original topic integrating Detox tests results with Jenkins pipeline. Our initial setup is Detox with Mocha as a test runner. If you followed official Detox Mocha setup guide your setup should be similar to mine:
- An
e2e/folder in your project root - An
e2e/.mocharc.jsonfile; example - An
e2e/init.jsfile; example - An
e2e/firstTest.spec.jsfile with content similar to this.
Mocha doesn’t produce xml out of the box, so we will need to add mocha-junit-reporter npm package:
$ npm install mocha-junit-reporter --save-dev
Now we need to configure our e2e/.mocharc.json
{
  "recursive": true,
  "timeout": 300000,
  "bail": true,
  "file": "e2e/init.js",
  "reporter": "mocha-junit-reporter",
  "reporterOptions": {
    "mochaFile": "./e2e/test-report.xml"
  }
}
The part we most interested in is reporter and reporterOptions (you would need to tell reporter where to put report xml file).
Now lets configure our Jenkinsfile pipeline:
pipeline {
    agent any

    stages {
        stage('Build') {
            steps {
                echo 'Building...'
                // add Build execution script here
            }
        }

        stage('Test') {
            steps {
                echo 'Testing...'
                // add Test execution script here
            }
        }
    }
    post {
            always {
                archiveArtifacts artifacts: 'e2e/', fingerprint: true
                junit 'e2e/*.xml'
            }
        }
}
The last part of Jenkinsfile pipeline is what need to be added so we can get test results:
post {
            always {
                archiveArtifacts artifacts: 'e2e/', fingerprint: true
                junit 'e2e/*.xml'
            }
        }
Let’s take a closer look at what it does. First we tell Jenkins to run this step always no matter what happen. Then we tell Jenkins where artifacts stored(log, reports, screenshots). Next we tell Jenkins where to find xml report.
And there you have it, push your code to repository and let Jenkins pick up pipeline configuration. Once tests completed you will get nice report in Jenkins and if tests fails you can always look at artifacts and see what happened there.


